14 September 2011

Unable to use Windows Updates on Windows Server 2008 R2 SP1 behind a WatchGuard Firewall


I recently installed Windows 2008 R2 Enterprise SP1 on an older Dell PowerEdge 2950. Dell does not make a server update and build utility for 2008 R2 on old PowerEdges. I manually initialized the RAID-5 array and booted to the 2008 install DVD. Windows found all the hardware and everything seemed to be running great until I was unable to successfully install Windows Updates with error 80072EFE. After 3 days of searching everywhere, a MS Knowledgebase article that explained the 80072EFE error as ERROR_INTERNET_CONNECTION_ABORTED.

We have two HTTP policies set in our WatchGuard XTM510 firewall. One is very restrictive and applies to most clients and devices on our network. The second policy is much less restrictive and allows more liberal access to http resources. We only use the second policy when there is an access issue for a user that we cannot resolve by adding application types of bypassed URLs to the policy.

Windows 2008 R2 SP1's Windows Update components must be more "sensitive" to the deep inspection that takes place in our first policy. Windows Updates would fail everything under policy 1, but when I added the server's host IP to policy 2, the updates ran perfectly.


08 March 2011

MAC - Windows 7 Shared Printer

With more MACs being deployed in the Windows server environment there is one thing that every IT person, professional and amateur, will encounter and that is trying to connect a Windows 7 USB connected shared printer to a MAC computer or laptop. Before telling the user who requested the shared printer on the MAC what you really think of them, your friendly neighborhood IT department has found a solution. It involves the "LPD Print Service" on the Windows computer and the "LPD/LPR Host or Printer" section on the MAC. Make sure the printer is on and shared out then do the following steps:

1. Open the Control Panel on the Windows 7 machine
2. Select "Programs and Features" from the menu selections
3. Click "Turn Windows Features on or off"4. Click the plus sign beside the "Print and Document Services" and make sure the "LPD Print Service" box is checked
5. Click "Ok" and/or "Apply" and close out of everything in the Windows 7 machine
6. On the MAC computer / laptop open the "Print & Fax" area via the "System Preferences" section
7. Click the "+" sign on the bottom left hand side to add the printer
8. In the window that opens up, click the "Advanced" button located near the top on the right hand side (If you do not see the "Advanced" button then right-click anyplace on the toolbar and then select "Customize Toolbar" then you can add the Advanced button it)
9. Select the "LPD/LPR Host or Printer" in the "Type" drop down field list
10. In the "URL" section, put your cursor after the "//", and type the name of the Windows 7 machine followed by the printer shared name. An example of this is in the following: Windows7ComputerName/PrinterShareName11. Select the approate driver for the Windows printer you want to connect
12. Click "Add" and you should be good to go
13. Do a test print to bring up the box that asks for a username & password for the printer
14. Put in the username & password of the Windows 7 user in the boxes
15. Click "Ok" and the test page should print on the printer

For more detailed steps on this issue, click here.

15 November 2010

Virtual Domain Controller Time Sync

Some I.T. departments have incorporated one or multiple virtual servers (virtual machines) on their domain for various reasons. Some use virtual servers to test out "the newest and latest software while others use virtual machines to implement more servers without having to buy more physical servers.

Whatever your case maybe, if you have one of the virtual machines as a secondary domain controller you may have experienced a time sync issue with your primary and secondary domain controllers where both domain controllers want to control the time for the whole domain. This issue can be resolved by turning off the "HyperV Time Synchronization Service" on the virtual machine that the secondary domain controller is on. Make sure you are logged in as Administrator on the virtual machine and do the following:


  1. Right click the My Computer icon

  2. Highlight and click Manage

  3. On the left hand side click the plus sign beside the word Configuration to expand it

  4. Click on Services

  • On the right hand side of the window scroll down till you find the HyperV Time Synchronization Service
  • and click on it
  • Right click the service and choose Properties

  • In the new dialog box that opened up make sure you are on the General tab at the top of the box

  • About half way down you should see the words Startup Type and a drop down box beside it

  • Click the drop down box arrow and choose Disabled
  • from the menu and hit Ok when finished, do a reboot on the virtual machine, and you should be good to go
    *** Once you log in after the reboot the primary domain controller should be the only controller in charge of the time for the entire domain. To check this just execute w32tm/monitor on the command prompt. ***

    As always for more information on this issue you may post a comment on this post and your friendly neighborhood IT department will get back with you or you can just click here.

    04 August 2010

    Desktop shortcuts gone in Windows 7

    Desktop shortcuts. In Windows XP we could have as many as we want to on our desktop and they would always be there. Naturally we thought that when Windows 7 was released it would have the same feature in it. Come to find out that most of our desktop shortcuts were disappearing from our desktop in Windows 7. This is caused by the "System Maintenance troubleshooter" that Windows 7 has. So the next time the shortcuts disappear instead of taking a Louisville Slugger to the computer to try and teach it not to erase all the shortcuts just following the simple 8 steps listed below courtesy of your friendly neighborhood IT department.
    1. 1. Click the Windows start button

    2. 2. Single click on Control Panel

    3. 3. Single click on the words System and Security

    4. 4. In the Action Center find and single click on the words Troubleshoot common computer problems

    5. 5. You should see the following window at this point

    6. 6. On the left hand side find and single click the words Change settings

  • 7. You should now have the following window:

  • 8. Under the System Maintenance
  • section make sure that the circle for "Off" is filled in and click Ok
  • 9. Exit out of everything and you should be good to go

  • For more information or a complete rundown on this subject please click the following link:
    http://http//support.microsoft.com/kb/978980

    18 June 2010

    Add a network folder to a library in Windows 7

    Have you ever wanted to redirect your "My Documents" folder to a network drive location in Windows 7 but couldn't quite figure it out? Windows 7 operating system will not allow you add network drives in the library unless these drives are indexed. Most network drives cannot be indexed unless they are synchronized. This limitation will cause or may cause some headaches from the seasoned IT professional to the general user who has a home network. Instead of thinking that putting Windows XP back on the computer might be easier, your friendly neighborhood IT department has the steps for you to try using the "mklink command, almost like a "workaround". Make sure you are logged in as Administrator or as an Administrator and do the following steps:
    1. 1. Create a temporary folder on the root of your hard drive and call it anything you want. (C:\Shares)

      ***As an example the folder I am going to create will be called "Shares". Your folder name may be a different name.

    2. 2. Go into the "Shares" folder and create another folder called Pictures (C:\Shares\Pictures)


    3. 3. Go into the library of the computer and link the library to the Pictures folder.


    4. 4. Delete the C:\Shares\Pictures


    5. 5. Open up Command Prompt
    and in an elevated command prompt type in the following:
    mklink /d c:\shares\pictures \\server\pictures

  • 6. Exit out of the command prompt and you should be good to go

  • You now have a network drive in your library. As always for more info on this or any of the steps, please post a comment on this blog site and your friendly neighborhood IT department will get back to you. You can also see more steps on this by clicking here.

    18 February 2010

    Windows Blue Screen Of Death - Volsnap.sys Error

    The ever famous Windows blue screen of death (BSOD). At some point people from the seasoned IT professional to the end user that uses a Windows computer at their home has encountered this. There are several different error messages that are displayed when you encounter the blue screen but today your friendly neighborhood IT department would like to answer the question about the "Volsnap.sys" error.

    This error is caused by a Volume Shadow Copy service that may have been corrupted or gotten unusable. The solution is simple, just replace the Volsnap.sys with the one on the install CD. Don't worry your friendly neighborhood IT department will not leave you hanging on how to do this. Here are the rundown of the steps:
      1. Insert the Windows install disk into the CD drive and reboot the computer

        2. Boot to the Windows Install CD if it doesn't boot to it automatically. ***The way to do this is different for each type of computer. For info on how to do this on your specific computer leave a comment on this post and your friendly neighborhood IT department will give you instructions on how to do this.***
          3. Once in the install CD content menu go into the Recovery Console section

            4. This should bring you to a screen where you can type in commands

              5. Type in the following command: expand D:\i386\volsnap.sy- c:\windows\system32\drivers\volsnap.sys
                6. You should get a message confirming everything is cool

                  7. Exit the install CD and reboot

                    8. Boot up to the hard drive and Windows should be coming up like normal with no blue screen of death

                    For more in depth details on this BSOD error and how to clear this error up, click on the following link http://forums.techarena.in/vista-help/1068921.htm

                    28 January 2010

                    Installing Symantec on Windows 7 OS

                    Have you tried to push your current version of Symantec out onto a machine that is running Windows 7 operating system with no results? Does your Symantec server indicate that everything was pushed out correctly but the Windows 7 machine doesn't pop up with anything remotely indicating that Symantec is installed on it? Instead of having to reimage the machine and start everything all over again, keep reading to find out what your friendly neighborhood IT Department has found out about this.

                    The problem resides in XML file of the Symantec program files labeled "SyLink". This file is what links the Symantec installed on your computer to your Symantec management server. The following steps should get your Symantec back online. Make sure you are logged on as an Administrator of the computer and do the following: **If you already have Symantec installed then skip down to step number 6.

                    1. Navigate to the location of your Symantec setup.ext file which is generally located in the following location:
                    Z:\SymantecMulti-Tier 11.0 MR\Symantec_Endpoint_Protection_11.0.5_AllWin_EN_CD1
                    ***Your drive letter may or may not be the letter Z***

                    2. Double click the Setup.exe file

                    3. The following menu should pop up

                    4. Click on the one that is labeled Install Symantec Endpoint Protection Client

                    5. Follow all the prompts to install the client Symantec and reboot after the Symantec installs

                    6. When Windows comes back on after the reboot, go into the Services section and stop all the Symantec Anti-Virus services

                    7. There are several ways to get into the services sections but one way is to right-click My Computer, click Manage and then click services

                    8. Single click on the drop down arrow on the words Services and Applications, and single click on the word Services

                    9. Scroll thought the services list, find and stop the following services: Symantec Endpoint Protection, Symantec Event Manager, Symantec Management Client, and Symantec Settings Manager

                    10. Once all of the above services have stopped, navigate to the following folder location: C:\Program Files\Symantec\Symantec Endpoint Protection
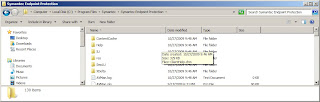
                    11. Copy your SyLink.xmlthis folder location and replace the SyLink.xml that is current there

                    12. Once the file has copied go back to the Services location to turn Symantec back on

                    13. Turn all the Symantec services back on that you turned off in step number 9

                    14. If your Symantec icon in the System Tray has a green dot on it then your Symantec is now linked up with your Symantec server and all is good

                    For more information on this issue you may post a comment on this or any post you see on this site and your friendly neighborhood IT Department will respond back to you.